PyQt by Example (Session 1)
Introduction
This series of tutorials is inspired by two things:
LatinoWare 2008, where I presented this very app as an introduction to PyQt development.
A lack of (in my very humble opinion) PyQt tutorials that show the way I prefer to develop applications.
The second item may sound a bit belligerent, but that's not the case. I am not saying the other tutorials are wrong, or bad, I just say they don't work the way I like to work.
I don't believe in teaching something and later saying "now I will shw you how it's really done". I don't believe in toy examples. I believe that you are smart enough to only learn things once, and learning the true thing the first time.
So, in this series, I will be developing a small TODO application using the tools and procedures I use in my actual development, except for the Eric IDE. That is because IDEs are personal preferences and for a project fo this scope really doesn't add much.
One other thing I will not add is unit testing. While very important, I think it would distract from actually doing. If that's a problem, it can be added in a later version of the tutorial.
Requirements
You must have installed the following programs:
Python: I am using 2.6, I expect 2.5 or even 2.4 will work, but I am not testing them.
Elixir: This is needed by the backend. It requires SQLAlchemy and we will be using SQLite as our database. If you install Elixir everything else should be installed automatically.
PyQt: I will be using version 4.4
Your text editor of choice
This tutorial doesn't assume knowledge of Elixir, PyQt or databases, but does assume a working knowledge of Python. If you don't know python yet, this is not the right tutorial for you yet.
You can get the full code for this session here: Sources (click the "Download" button).
Since this tutorial is completely hosted in GitHub you are free to contribute improvements, modifications, even whole new sessions or features!
Session 1: The basics
The backend
The most recent version of this session (in RST format) is always available at GitHub's master tree as tut1.txt
Since we are developing a TODO application, we need a backend that handles the storage, retrieval and general managing of TODO tasks.
To do that the simplest possible way, I will do it using Elixir, "A declarative layer over the SQLAlchemy Object-Relational Mapper".
If that sounded very scary, don't worry. What that means is "a way to create objects that are automatically stored in a database".
Here is the code, with comments, for our backend, called todo.py. Hopefully, we will not have to look at it again until much later in the tutorial!
 # -*- coding: utf-8 -*-

 """A simple backend for a TODO app, using Elixir"""

 import os
 from elixir import *

 dbdir=os.path.join(os.path.expanduser("~"),".pyqtodo")
 dbfile=os.path.join(dbdir,"tasks.sqlite")

 class Task(Entity):
     """
     A task for your TODO list.
     """
     using_options(tablename='tasks')
     text = Field(Unicode,required=True)
     date = Field(DateTime,default=None,required=False)
     done = Field(Boolean,default=False,required=True)
     tags  = ManyToMany("Tag")

     def __repr__(self):
         return "Task: "+self.text


 class Tag(Entity):
     """
     A tag we can apply to a task.
     """
     using_options(tablename='tags')
     name = Field(Unicode,required=True)
     tasks = ManyToMany("Task")

     def __repr__(self):
         return "Tag: "+self.name


 saveData=None

 def initDB():
     if not os.path.isdir(dbdir):
         os.mkdir(dbdir)
     metadata.bind = "sqlite:///%s"%dbfile
     setup_all()
     if not os.path.exists(dbfile):
         create_all()

     # This is so Elixir 0.5.x and 0.6.x work
     # Yes, it's kinda ugly, but needed for Debian
     # and Ubuntu and other distros.

     global saveData
     import elixir
     if elixir.__version__ < "0.6":
         saveData=session.flush
     else:
         saveData=session.commit


 def main():

     # Initialize database
     initDB()

     # Create two tags
     green=Tag(name=u"green")
     red=Tag(name=u"red")

     #Create a few tags and tag them
     tarea1=Task(text=u"Buy tomatos",tags=[red])
     tarea2=Task(text=u"Buy chili",tags=[red])
     tarea3=Task(text=u"Buy lettuce",tags=[green])
     tarea4=Task(text=u"Buy strawberries",tags=[red,green])
     saveData()

     print "Green Tasks:"
     print green.tasks
     print
     print "Red Tasks:"
     print red.tasks
     print
     print "Tasks with l:"
     print [(t.id,t.text,t.done) for t in Task.query.filter(Task.text.like(ur'%l%')).all()]

 if __name__ == "__main__":
     main()
The Main Window
Now, let's start with the fun part: PyQt!
I recommend using designer to create your graphical interfaces. Yes, some people complain about interface designers. I say you should spend your time writing code for the parts where there are no good tools instead.
And here is the Qt Designer file for it: window.ui. Don't worry about all that XML, just open it on your designer ;-)
This is how it looks in designer:
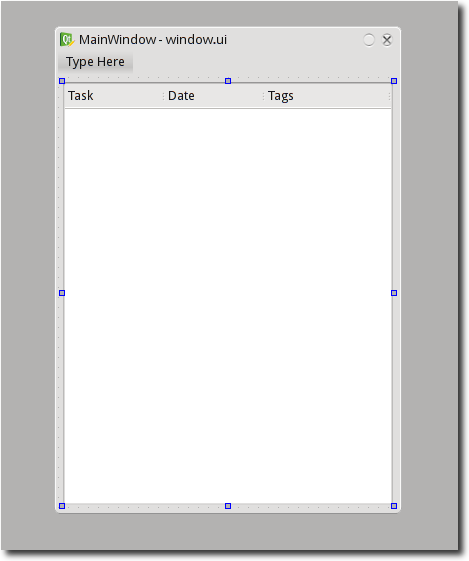
The main window, in designer.
What you see is a "Main Window". This kind of window lets you have a menu, toolbars, status bars, and is the typical window for a standard application.
The "Type Here" at the top is because the menu is still empty, and it's "inviting" you to add something to it.
The big square thing with "Task" "Date" and "Tags" is a widget called QTreeView, which is handy to display items with icons, several columns, and maybe a hierarchical structure (A tree, thus the name). We will use it to display our task list.
You can see how this window looks by using "Form" -> "Preview" in designer. THis is what you'll get:
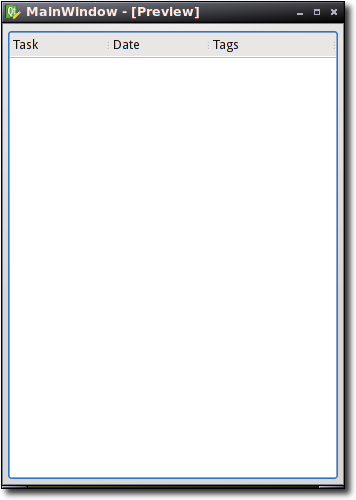
The main window preview, showing the task list.
You can try resizing the window, and this widget will use all available space and resize alongside the window. That's important: windows that can't handle resizing properly look unprofessional and are not adequate.
In Qt, this is done using layouts. In this particular case, since we have only one widget, what we do is click on the form's background and select "Layout" -> "Layout Horizontally" (Vertically would have had the exact same effect here).
When we do a configuration dialog, we will learn more about layouts.
Now, feel free to play with designer and this form. You could try changing the layout, add new things, change properties of the widgets, experiment at will, learning designer is worth the effort!
Using our Main Window
We are now going to make this window we created part of a real program, so we can then start making it work.
First we need to compile our .ui file into python code. You can do this with this command:
pyuic4 window.ui -o windowUi.py
Now let's look at main.py, our application's main file:
 # -*- coding: utf-8 -*-

 """The user interface for our app"""

 import os,sys

 # Import Qt modules
 from PyQt4 import QtCore,QtGui

 # Import the compiled UI module
 from windowUi import Ui_MainWindow

 # Create a class for our main window
 class Main(QtGui.QMainWindow):
     def __init__(self):
         QtGui.QMainWindow.__init__(self)

         # This is always the same
         self.ui=Ui_MainWindow()
         self.ui.setupUi(self)

 def main():
     # Again, this is boilerplate, it's going to be the same on
     # almost every app you write
     app = QtGui.QApplication(sys.argv)
     window=Main()
     window.show()
     # It's exec_ because exec is a reserved word in Python
     sys.exit(app.exec_())


 if __name__ == "__main__":
     main()
As you can see, this is not at all specific to our TODO application. Whatever was in that .ui file would work just fine with this!
The only interesting part is the Main class. That class uses the compiled ui file and is where we will put our application's user interface logic. You never edit the .ui file or the generated python file manually!
Let me put that in these terms: IF YOU EDIT THE UI FILE (WITHOUT USING DESIGNER) OR THE GENERATED PYTHON FILE YOU ARE DOING IT WRONG! YOU FAIL! EPIC FAIL!. I hope that got across, because there is at least one tutorial that tells you to do it. DON'T DO IT!!!,
You just put your code in this class and you will be fine.
So, if you run main.py, you will make the application run. It will do nothing interesting, because we need to attach the backend to our user interface, but that's session 2.
Nice work. I'm impatient so see next part.
Note: The elixir link is wrong.
Thanks
Fixed, thanks!
Very good. Keep it up!
Genial!
Me canse de pedirtelo mientras estuvimos alla
BTW Felicitaciones por retomar el blog, de casualidad se me ocurrio volver por estos lares y veo que volviste y afilado!
Buen... hora de meterle a Pyqt parece
Tarde pero inseguro, como siempre :-)
Thanks so much for this. Just finished #1, and going to do #2 tonight.
BTW, for those using an older version of Elixir like me (I'm just using the one that comes with Ubuntu Intrepid), you need to do session.flush() instead of session.commit()
Hmmm.... maybe I should fix that in the code so it works for both versions.
Just followed session #1. Had to change the following statement to get it compiled correctly:
from windowUi import Ui_MainWindow
into:
from Ui_window import Ui_MainWindow
since the file is named Ui_window.py.
For the rest, looks very interesting, especially the "preparation" I had to do with Elixir, setuptools an SqlAlchemy. That made me learning a few more nice Python apps.
@Geert, the .py file will be calld whatever you say when you call pyuic. The tutorial says
pyuic4 window.ui -o windowUi.py
but if you made it work, all is well :-)
From the above remark, it's important to mention I'm using Eric4 to work on the project. Hence, the resulting UI file is called Ui_window.py (by Eric4) iso windowUi as been given in the article.
So, no issue...
@geert: Oh, eric! I will change it so it's compatible with eric's naming, since it's the same for me.
Is possible to instal elixir in windows?
I solve the problem using easy instal
Roberto, fijate cuando hacés los test en todo.py, intercalás nombres de variable en castellano e inglés (seguramente es culpa del traductor, claro). Creás dos etiquetas (verde y rojo) y después haces green.tasks y red.tasks. Obviamente genera un error cuando lo ejecutás.
Por cierto, muy bueno el tutorial.
Cuando vi la linea esa en donde trasnformas el archivo .ui a uno .py me sacastes de encima un gran peso. En serio yo vengo de dar mis primeros pasos. Y algo a futuro es ver esto de pyqt y mirando asi como quien no ve todo. Me encontre con que el designer(perdon si lo escribo mal.) no genera el archivo .py. En mi caso vengo de laburar con wxpython y un programa que aunque no me gusta ni mierda(wxglade) es lo que se usar por que generaba las ventanas en .py. Y la verdad que ahora me siento mas liviano. Muchisimas gracias.
A great article! I am currently learning PyQt and find this a great beginner article. Thanks!
Hey:
Sólo quiero saber una cosita, mira tengo un QMessageBox con sus standard buttons, y estos son 'OK','Cancel', 'No' Como le hago para cambiarlos a español, es facil o no? Gracias mano, ahora bien como se instala elixir. God Bless U
Lo de la traducción es fácil, mirá el principio de main() en este link:
http://code.google.com/p/ma...
En la linea 1433 se carga una traducción de la aplicación, en la 1437 se carga la traducción de los dialogos standard de Qt (ahí están ese OK y Cancel)
Para instalar elixir: Los detalles dependen de qué sistema operativo estés usando, pero en la pagina de Elixir hay informacion:
http://elixir.ematia.de/tra...
The materials are great but you know guys, you were suppose to make a tour guider manual for python. My first experience ia great and I feel is better than cpp but because am used to cpp, which has the simplest tour manual guide, it makes cpp easier though it is diffucult than python. It will be good for my fellow self learner easier, because it is not offered here. With the help of Sarah. Will continue to work on it, hoping that will keep toutch with each other.
Really, I was supposed to do that? Good to know!
I tried with latest pyQt4 (PyQt-Py3.1-gpl-4.7.7-1) .
Need to change the line:
"from MainWindow import Ui_MainWindow" to "from windowUi import Ui_MainWindow" since the UI file name of the generated is windowUi.py
With that change, this code works fine in latet pyQt version 4.7.7
Very good. Excellent!
Many thanks, I'm glad you have a clear, step by step tutorial like this. - Muchas gracias!